Pages

Sunday, March 18, 2012

Chairs at Gallery


This is a picture of the chairs I had on display at Noyes Art Gallery. If you look around, you will find some old chairs that are sound, but in need of a face lift. I painted the canvas seats that cover two of the chairs. To start, just sand all the shiny off of them if they are stained and varnished. Then put a coat of primer on, after it has dried start painting! Remember, you can always paint over it if you don't like it, so don't worry about making a mistake. If you purchased your chair from a thrift store or
garage sale, you don't have that much in it even if you do think you ruined it. But, again, if you don't like what you have done, paint over it. The key is to have fun.


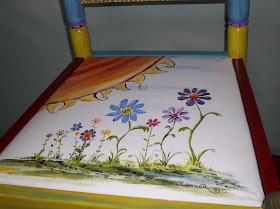
 This is a close up of the painted daisy seat. This was done on canvas with acrylic paints.


This is a close up of the funky flower seat. Again, acrylic paints on canvas I used to recover the seats.


The Body of the chair I painted with spray paint and then embellished with paint pens and acrylic paints. The spray paint is fast, but is not as durable as painting it by hand. I used  several coats of spray sealer also. Again, the spray sealer is not as durable as hand painting the polyurethane on.


Here is a picture of the "Sit and Dream" Chair. Has on the rim "Oh how I love to sit and dream"... Hand painted with acrylic paint, then 4 coats of polyurethane.This chair was purchased on the "Junk Jaunt" held every year in Nebraska. Hundreds of miles of garage sales! I was in 7th heaven. My sister Mary Ann and I went together in my van and had to come back and unload once. Hmmmm....  I think I still have some of the "junk" at her place!  Catch you later, Carolyn

Sunday, March 11, 2012

Sunshine CLock


This is a fun clock that I found at a garage sale. You can take almost anything and make it fun with a coat of paint. I take all my clocks apart to paint them and then reassemble them. It is easiest. If your clock is not working but you like the shape, you can get the a new clock mechanism at Hobby Lobby or another craft store. I like to paint the pendulum to make it funky also. You can't see it in this picture, but the long shank of the pendulum is black and white striped, and then you can see part of the round circle  is a bright aqua with black polka dots. Just have fun.  To do the numbers, I find a font I like and then print the numbers on typing paper, cut them out in little circles for positioning them, and then transfer them to the face of the clock. (After you have painted it) Instead of graphite paper, ( which sometimes smudges) you can take the image, turn it over. You will be able to see the image through the paper. Outline it on the back of the paper with a pencil several times. This way, when you flip the image back over to transfer it, it will only transfer the lines you are outlining, on the right side of the paper that you have previously outlined on the back.  No smudges.  If this is as clear as mud to you,  just email me and I will try to explain it better. Well, my 19 year old dog is pacing, and when she does that I have learned  that means "I want to go out....NOW!" Ta ta for now.

Saturday, March 10, 2012

Dry Sink

This is a dry sink that was one of the few pieces I purchased new. I had this unpainted in my home for several years, and then it seemed to look outdated with the country heart look. Originally there was wire across the heart opening.  

Dry Sink

 
This is a close up view of the Dry Sink. Notice the dry brushing which gives the drawers the  bluish tint. You can do this by first painting the undercoat (mine was green in this picture) load the blue sparing on your brush, then wipe most of it off on a paper towel or cloth, and then just lightly brush over the desired area several times until you have the look you like.

Cats on Wood, Dry Sink, Chair


This is a dry sink that I took to the gallery. On this piece I did not prime it. I wanted the Wood to show thru in places, and give it the distressed look, like on the door. I loved this and was sad when it sold, but I used the money to buy new junk(treasures)! So I guess it all works out in the end. I will try to find a better picture of the chair, it had a neat shape.
The cat picture and the chair had lots of checkerboard on them. You need a very chizle edged brush to do this. One that comes to a thin blade so to speak. Make sure that  you do not have too much paint on your brush or you will end up with a round bottom to your check.
Posted by Picasa

Bread Box

This bread box was a purchase from a garage sale. I wish that I was better at taking "before" pictures. I will have work on that!   It caught my eye because it was very rough, and was handmade by the  gentleman that was having the garage sale. I love one of kind pieces. I purchased it for $5. I painted it up and took it to the gallery, and it sold the first night. I have since done another bread box and it sold pretty fast too.


Maybe I should do more bread boxes.....hmmm. I have one in the studio now that I have been wanting to start on. It is all sanded down, and ready to be primed. That is the first step for everything. Sanding it, and getting the shine off of it. Then a coat of good primer to make sure the paint sticks. Sometimes I sand the primer, and sometimes I don't. Depends on how smooth it feels. If you want a really smooth feel, paint a couple of coats of gesso on after the primer, sand lightly, wipe it off good with a tack cloth,  and then apply your paint.  If you don't sand good, and then use primer, the paint will lift off. Sometimes, it  looks like it is stuck good, but if a person were to put a piece of scotch tape on it, and then try to take the tape off, many times it will pull the paint and polyurethane right off.

By the way, a good use for a bread box (besides keeping your bread in it) is to make it a charging station for your phone and ipod. Just drill a hole through the back for the cords and you have a nice little docking station out of sight.  That's my tip for the day.  It's Saturday night date night at our house so I had better get ready!

Friday, March 9, 2012

Hi Everybody, this is my first attempt at blogging!  I keep waiting for just the perfect thing to start out with, but it doesn't look like my brain is going to cooperate, so..... I guess I will just begin.  I love painting furniture and as my blog develops, I will post more pictures of past projects and tips on how they came to be. I love color as you can see, and I've been told my furniture just makes you smile to look at it. I hope you enjoy looking at it half as much as I enjoy putting on the paint!
My goal is to share some ideas, my art, and to answer any questions that I can. I certainly don't claim to know everything but will be glad to let you know what has worked for me.
Most of my projects are repurposed pieces, garage sale finds, cast offs or thrift store pieces.  I see them and just want to breathe new life into them so that they are once again enjoyed and loved.

 I also do commission work like this piece. A friend from the gallery I display in (Noyes Art Gallery in Lincoln, NE) commissioned me to do this adorable little table. Here are some before and after pictures to give you an some ideas of what you could do with some old pieces of furniture you have laying around.


This is a what the table looked like before I started painting. I have sanded it at this point and patched a few boo boos. Not too appealing, right?


This is what the table looked like after a few (hundred thousand ) brush strokes.


Makes you want to to start looking around your basement for hidden treasures right?

Here is a chair I painted for a benefit for Kylie Remmereid.


Kylie's Chair

The seat is recovered with canvas (painters canvas preprimed) . When I decided to paint this, I couldn't find the seat I had taken out so I was cutting a new one at 2am so that I could recover it, and have it painted for the next day and ready to be delivered by 10:30 AM. I don't know why, but I always seem to work better under the pressure of a deadline. Are you like that? ..And yes, I was tired the next day.


 I love to do polka dots and as you read more of my blog, you will see a lot of polka dots! The top little knobs are always crying for polka dots, even before I know what color the chair is going to be,.....I KNOW there will be polka dots on the little knobs.


This picture was taken at the Gallery in Lincoln, part of my display for the month. This is a cabinet that was hand made. I found it at a garage sale. It originally was just brown, had a mirror in the oval opening, and was roughly finished.


Interestingly, I talk about having treasures lying around in your basement and how you should get them out and make them fun, ....I had this started for at least 3 years before I drug it out and painted it! I can tell you that I was glad I had already put a base coat on it before I started on it again. Those little boxes on the side were kind of tough because my paint brush was too long and kept running into the sides.

The knob on the front was an old finial part from a second hand store down town here, and I just doodled on a couple of them a few years back. It seemed to go well with the rest of the piece, What do you think? I like to put funky knobs on my things.


The little flowers in the center were kind of a fun touch, people seem to really like the little flowers.


I was pleased with the way it turned out and I guess other people liked it too because it is sold!..

So what pieces of furniture do you have hanging around that have seen better days, or that you are just tired of? Stay tuned and I will give you some tips on what has worked for me . Feel free to email me
csoconnor1@aol.com
with any questions, or just leave them in the comment section and I will do my best to answer them. Remember, it doesn't have to be fancy or real detailed to make a big difference and make you love it again. So start looking for some projects.

Ta Ta for now.